After a certain time, any plumbing equipment, even expensive and durable as a cast-iron bathtub, may become unusable. But a complete replacement is not the only way to eliminate unpleasant defects. A compromise solution is cosmetic restoration of the surface of the product.
We will tell you how to paint a cast-iron bath, in what sequence the work is performed, what material will be required for them. In our article, we describe in detail the technologies for applying a protective and decorative coating. Recommendations are given, the observance of which to ensure the optimal result.
Reasons for restoration preference
In the course of regular use of the bath, its upper enamel layer becomes much thinner, as a result of which chips, scratches, blackness, rusty smudges appear.
The adoption of water procedures in such a bath is not very pleasant and aesthetic.
Image Gallery
Photo from
Advantages of painting a cast-iron bathtub
Individual interior solution
Feature Recovery
Painting the outside of the bowl
Decorative painting of the walls of the bowl
Hand painted bath
Ease of preparation
The need for technology
An old bath can ruin even the most expensive interior. In addition, dirt and harmful microorganisms accumulate in microcracks and damage to the enamel, which is unsafe for health. Of course, this encourages the owners to think about changing the old bath to a new one.
But in this case, a financial question arises, since the cast-iron bathtubs now produced, even the most inexpensive and not very high-quality ones, are not cheap.
In addition, when replacing the bath, it will be necessary to dismantle the old plumbing, which is almost always associated with a violation of the finishing elements. Therefore, not all homeowners for various reasons have the opportunity and desire to change the old bath to a new one.

By painting an old cast-iron bath, it is possible to restore not only previous aesthetic qualities, but also restore technical characteristics, as well as eliminate the foci of resettlement of harmful microorganisms
These reasons include:
- lack of financial ability to buy an expensive bath
- unwillingness to spend time and money on transportation, dismantling, installing a bathtub and repairing tiles;
- the irrationality of changing the cast-iron bathtub of "Soviet" quality, since today such products are very expensive;
- saving, why throw away a cast-iron reliable bathtub that retains the heat of water for a long time.
However, masterful owners are often haunted by doubts about the positive results of installing a new cast-iron bathtub. Often the possible unpleasant odor, noise, dust, dismantling of the bath scares.
In this case, the best solution would be painting the bath. Indeed, changing the enamel is quite an easy task, but requiring accuracy and clarity of the instructions.
If you have the time and desire to maintain the family budget, then you need to prepare all the necessary fixtures and materials and start painting. Your bathtub will become fresh and perfect, as if from a store.
The average consumer immediately raises the question - will this venture justify itself from a financial point of view? Restoration of the bath in any case will cost several times less than buying a new one, regardless of the chosen method of work. You can not only save, but also increase the operational life of your bath by several times.

Having a desire, the artist's initial skills and developed imagination during the painting of the bath, her bowl can be uniquely painted
Restoring the original look of outdated plumbing does not take much effort and time, and the results will surely please you. The cost of the necessary materials is relatively low compared to the price of a new high-quality bath.
The main motivation for the preference for the restoration of cast-iron baths is the obvious benefit of this event, the speed and simplicity of execution, the ability to give the product any chosen shade.
Today, several simple methods have been developed to return worn-out plumbing to its former, flowering appearance and to continue successful operation, with a minimum of financial costs.
There are such methods for this:
- Drawing on a working surface of an old bathtub of the new enameled covering.
- Filling the bowl with liquid acrylic.
- Installation on a damaged bathtub of a special finished acrylic liner.
The widespread belief that such work can only be done by an experienced specialist is wrong.
The implementation of these restoration works is quite accessible to everyone. Before deciding on independent actions or entrusting a business to a professional, evaluate your capabilities. Painting the bath on your own will cost only the purchase of materials without paying for the work.

Exactly following the instructions of the manufacturer of the coloring material indicated in the instructions without fail, you can paint the bowl of the bath yourself
Necessary stages of restoration
The need for restoration measures is determined in the presence of defects on the surface of the bath, such as roughness, cracks, rust, loss of original color. Complete renewal of the bath tank consists of five steps.
The list of main works
Any painting of a cast-iron bath consists of such procedures as:
- Degreasing. Before restoration in any way, it is first necessary to thoroughly degrease the bath. For this, calcareous and greasy deposits are removed using potent alkaline solutions and mechanical treatment.
- Removing old enamel. The process is carried out using sandpaper or grinding technology.
- Removing dust and enamel residue. The peeled-off enamel is cleaned with a vacuum cleaner and washed off with water.
- Drying the surface of the bath. For high-quality drying of the bowl of the bath, an ordinary or building hair dryer is used.
- Painting process. It is performed according to the selected method.
The whole process of painting the bowl of the bath is to paint from the sides to the bottom of the entire surface. For greater efficiency, the application of the material is carried out in two stages.
The bottom of the bowl is processed at the very end of the process. After restoration it is necessary to dry the entire new surface of the bath. Depending on the material used, it is better to use the bath after 2-6 days, so that the new coating is completely dry.
During work and during drying, it is necessary to prevent water, dust, and any contaminants from entering the surface of the bathtub. To do this, taps and showers are carefully insulated, and the door is tightly closed. Work is carried out in special clothes and gloves.

For bath coloring, only formulations specially manufactured for this purpose are suitable. The product must be water repellent, resistant to abrasion, safe
Types of degreasing and rules for their implementation
To obtain a durable and reliable new coating, high-quality degreasing of the bath bowl before painting is of great importance. Degreasing can be done in two ways. In the first case, baking soda, a metal dish scraper, and coarse sandpaper are used.
Baking soda is applied to the scraper and the entire bowl of the bath is processed in a circular motion, removing fat deposits. The most carefully processed places of chips and cracks. A tile bordering the sides of the bathtub is also washed. Masking tape is glued onto it before painting.

To exclude accidental brush strokes outside the bowl, stick tape to non-staining adjacent areas. It is necessary to glue overflow and drain, which must be closed before scotch tape so that the composition does not flow into the sewer
The same procedure is repeated using sandpaper. If the pollution is not strong, degreasing is carried out only with soda without using an abrasive. This method is considered the most economical and is used in the restoration of all types of bathtubs.
The entire degreasing process takes about 30 minutes. It is not recommended to use grinding wheels and a grinder, as unwanted black marks may form on the surface. At the end, the bath bowl is thoroughly washed with soda. This technology is best suited for the restoration of previously acrylic bathtubs.
The second method of degreasing is more used in the processing of enameled cast-iron bathtubs. Here are used: brush with a pile, sandpaper, degreasing agent, automotive putty. After thorough sanding, a degreasing agent is applied with a brush over the entire area of the bath bowl for 5 minutes.

Proper preparation of the bath surface for the upcoming staining will ensure perfect adhesion when applying the composition. The bowl must be cleaned, degreased, if necessary, repair cracks and potholes, then apply soil
The largest defects must be repaired with quick-drying putty. The places of discharge and overflow are thoroughly degreased. All applied materials must be removed from the surface to the factory base.
To check the quality of degreasing, water is poured onto the surface of the bath. If water droplets quickly drain without stopping or accumulating, then the procedure has been carried out correctly.
The right choice of work technology that is most suitable for the condition of your bath is very important, otherwise restoration will not give the desired result.
Image Gallery
Photo from
Stage 1: Surface application
Stage 2: enamel cast-iron bath
Stage 3: Removing masking tape from the sides
Stage 4: Polymerization Break
Enamel bath restoration
Bathtubs, the installation of which was carried out in the old days, are of enviable quality. But, as time has shown, their weak point is the enamel coating. Over time, during prolonged use, the enamel layer is depleted, rust spots appear on the surface of the bathtub, a mesh of small cracks, the whiteness and the ideal coating are lost.
In this case, the lean owners will be able to correct the situation by restoring the bath with enamel evenly applied to the inner surface of the bowl. Even the oldest bathtub will take on its original appearance after organizing a quality new coating.

The bottom of the bath bowl is painted after applying paint to the walls of the bowl, the remainder of the coloring mixture flows into the pan
Features of enameling
We will make a reservation right away that this method of restoration is far from being in any bathtub.
Enamel painting will be the best solution if its surface:
- darkened, yellowed or dark spots are visible;
- became rough and covered with a network of small cracks;
- on the face of lime deposits, mold;
- partially or completely lack of gloss enamel.
Such defects will easily disappear under a new enamel layer. But if there are more significant destruction of the surface layer, such as bulk chips, deep cracks or enamel falling off in pieces, then it is necessary to use other restoration technologies, since this will not give the desired effect.
A positive update result also largely depends on the correct choice of enamel application method and on the purchase of a quality product for work.
Savings in paint may result in the need for a second restoration. Professionals recommend choosing products of well-known, trusted manufacturers, despite a slightly higher cost, because it fully meets all quality standards. Only a high-quality product will help you to guaranteedly restore the surface enamel layer of the bath to a snow-white state.
Excellent characteristics are possessed by epoxy enamel or two-component polyurethane enamel. The painting itself must be performed in two or even three layers to obtain a guaranteed restoration result.

Application of the coating composition in several layers in several layers will provide the new bath with a special whiteness
For applying each new enamel layer, a portion of the coloring composition is prepared anew. After thorough mixing, the components of the prepared enamel gradually harden and after 2-3 hours the mixture will be unusable. Therefore, enamel is prepared portionwise in the right amount.
Before applying a new layer, the previous one is thoroughly dried and degreased, according to the manufacturer's instructions. For better adhesion and fluidity of the composition, the enamel is kept in a container with heated water before mixing with the hardener.
Methods for painting the bath with enamel
The most important and crucial step in the restoration of the bath is the application of enamel on the prepared surface. Without using the services of hired specialists, you can paint the bath at home with your own hands using two methods - painting with a flute brush or a spray gun with a compressor.
To carry out restoration work with this method, you need the following:
- high-quality enamel;
- quick-drying primer for puttying larger cracks;
- a degreaser such as acetone;
- detergent;
- rough sandpaper or other abrasive;
- napkins or rags of natural composition;
- construction tape, plastic wrap;
- rubber gloves and overalls.
Before work, the prepared coloring agent is better divided into two parts - for start and finish coatings. The base layer of enamel is applied with a wide brush and a thin layer. Work begins from the bottom of the bath tank. It is necessary to cover the entire surface of the old layer with new enamel, smearing the paint with a brush carefully and evenly.
If the pile from the brush got on the enamel, it is removed with a knife or tweezers, in no case touching the paint with your hands. Without waiting for the base layer to dry and preventing dusting of the already applied enamel, after 20 minutes they do the finishing work.
The second part of the enamel is applied with the same brush with the direction of movement from the middle to the top. After painting, you need to give time about 15-20 minutes for spontaneous straightening of enamel. Then, with a brush, the enamel smudges that are not straightened are carefully removed with movements from the middle to the edges.
This must be done in time while the enamel is still mobile and has not lost fluidity. Now leave the bath alone until the enamel layer is completely distributed and dried. Do not use plumbing for another 3-6 days, depending on the manufacturer's recommendations.

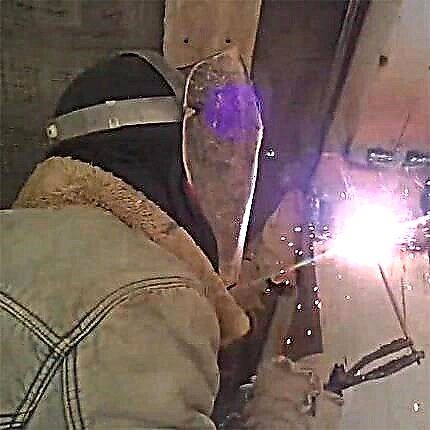
Work with a spray gun requires the use of personal protective equipment
Application of enamel with an airbrush differs in a number of its advantages. We easily get a smooth and even surface with low material consumption and without putting much effort. But for this purpose it is necessary to work with a professional tool.
Aerosol cans will not give the desired result. Practice has shown that it is most rational to comprehensively resolve the issue. Namely, the starting coating should be done with a brush, and the finishing spray should be done. So you are guaranteed the perfect new bath cover.
Restoring an old acrylic bathtub
Ten years ago, the restoration of the old bath was only possible by painting with enamel. Today there is another alternative way to restore the damaged surface layer of the bath bowl using modern material - liquid acrylic.
With such material, it is possible to easily transform your obsolete plumbing on your own literally in a matter of hours and increase its operational life by another ten years.

Restoring a bowl of a cast-iron bathtub with liquid acrylic is easy and does not require professional skills
Acrylic Paint Benefits
Acrylic is a unique material. Thanks to its properties, the old worn-out sanitary ware turns into a brand new one, as if from a store. The material has excellent mechanical, chemical and decorative qualities. Excellent quality for the device surface of the bath is its good anti-slip properties.
For the reconstruction with acrylic, it is not necessary to dismantle the tiles and the bath tank, which greatly simplifies and speeds up the process. Most often, for work in this category, a liquid or bulk type of acrylic called Stacryl, etc. is used.
Image Gallery
Photo from
We divide the pre-prepared acrylic composition into portions and pour into a container suitable for application
Acrylic enamel composition is evenly poured on the sides of the bath
Liquid acrylic is applied in uniform portions along the perimeter of the entire bowl. Its own weight will make it flow down, painting the walls and bottom
Along the line adjacent to the wall of the bath, in the darkest parts of the bowl, we distribute the composition with a plastic spatula, trying to paint over all the places
Once again, pour the composition on the sides. Acting with the same spatula, carefully distribute the composition in places weakly filled with liquid acrylic
Add the composition to the sides until liquid acrylic drains to the bottom and fills its surface. Excess funds drain into the drain, under which you first need to substitute the unnecessary capacity
With a spatula, we distribute liquid acrylic along the bottom of the plumbing, trying to direct it to unpainted gaps
The room with the painted bath is tightly closed by the door. The polymerization of the composition should not interfere with dust, hair, drafts
Step 1: Dividing the composition into convenient portions
Step 2: applying liquid acrylic to the sides
Step 3: Distribution of the composition along the perimeter of the bowl
Step 4: Filling Problem Areas
Step 5: Painting the walls of the plumbing
Step 6: pouring acrylic to paint the bottom
Step 7: Spatula Tubing
Step 8: Waiting for Polymerization
The benefits of these funds include:
- good fluidity for ease and uniformity of application of the layer;
- perfect smoothness of the resulting surface, without flaws, bubbles and roughness;
- low thermal conductivity, maintains water temperature for a long time, there is no extraneous smell;
- ease of operation and maintenance; sometimes it is enough to wash with soapy water;
- high strength and wear resistance of the acrylic layer;
- Whiteness and excellent gloss lasts a very long time.
The material consists of two components - directly acrylic and a special hardener, which, when combined, give a very dense, reliable film with a thickness of 3 to 7 cm.
Before applying a new acrylic surface layer to the bath, similar preparatory procedures are carried out as with enamel painting. The old surface is well treated with emery, washed off the dirt, degreased with a solvent or soda, if necessary, treated with filler and proceed directly to the processing.

If the bath bowl is preheated before work, the acrylic layer will lay down more evenly
Carrying out the technology "bulk bath"
This restoration technology is suitable for acrylic and enamel cast-iron bathtubs. To carry out work on your own, you need to prepare the appropriate acrylic composition, a plastic container with a volume of up to 1 liter, a small metal spatula and a flashlight for easy quality control.
The whole technology of the bulk bath consists of the following items:
- The mixture is prepared according to the instructions of two components. Part of the solution is poured into the prepared plastic container for direct filling of acrylic.
- A small neat stream of liquid acrylic from a glass is poured around the perimeter of the upper contour of the bath. With a spatula, the composition is launched under the edge of the facing tile.
- The poured coating should drain to half the walls of the bath.
- When working, do not use brushes and rollers.
- The lower part of the walls of the bath and its bottom is poured while passing along the second circle of the spiral, maintaining a layer of 5 mm.
- Excessive mixture drains through the drain into the substituted pan.
In case of the formation of sag during operation, they do not need to be corrected; after drying, everything will be fixed on its own. When restoring acrylic, one trick is observed - the working surface should be warm. To do this, the bathtub is pre-filled with hot water for 5-10 minutes.

For the convenience of applying a liquid product on the sides of the bath, it is better to use portioned containers with a volume of about 1 l
After draining, the surface is thoroughly dried with a cotton cloth and dried with a hairdryer. Before painting and during the process, penetration of moisture to the surface is unacceptable, since acrylic adheres poorly to wet. Acrylic coupling is carried out mainly due to the roughness of the base and the structural integrity of the material itself.
If the acrylic coating leaks out, then the water will quickly destroy it from the inside. To prevent such consequences, you can use an additional layer of acrylic. The thickened surface acquires good operational strength. It is desirable to carry out the entire filling procedure gently, but quickly, since the acrylic sets and loses fluidity.

Bulk for restoration of the bath is applied in at least two full layers. The number of coating layers is indicated by the manufacturer of the composition
The technology of filling with acrylic should ideally take about 2-3 hours no more. After complete polymerization of the finished layer, after 1-6 days, the drainage system is connected and the bathroom can be used. As can be seen from the foregoing, such repair of an old bathtub is not complicated and affordable for almost everyone, even a person far from construction.

If a modifying pigment is added to the bath coloring agent, the bath can be given a favorite color
Alternative to painting the bath
This is what the people call the restoration of the surface of an old bathtub by installing an acrylic liner. The essence of the method is the installation of a finished acrylic liner that fully matches the configuration of your bath. From the point of view of execution, this method is the simplest. No need to prepare the surface degrease, grind, dry.
But there are some nuances here:
- perimeter of the liner is fitted;
- processing the surface of the bowl with emery, because it is necessary to increase the roughness of the base;
- a special adhesive polyurethane is applied from the sides and down the bath;
- the sides and body of the liner are tightly pressed to prevent the formation of voids between the surfaces.
You can use the plumbing and connect the siphon after 5-6 hours. Pay particular attention to matching the bath and liner profiles, otherwise repair is not possible. You will learn the advantages with the drawbacks of the liner and the bulk bath by reading the article we recommend.
This method of restoration, although the most simple, but at the same time the most expensive of those listed. To guarantee a good result, weigh your options and choose the most affordable way to restore your old bath.

The coincidence of the shape of the liner with the shape of the bath is a prerequisite for the method of restoring the technical characteristics of the bowl
In order for the enamel recovery procedure to occur as rarely as possible, it is necessary to properly care for the cast-iron bathtub. The following article is devoted to methods and means of care, the contents of which we advise you to read.
A roller with a visual representation of the stages of staining:
The method of using liquid acrylic:
Remember that you can restore your own bath to almost perfect condition every bath, regardless of its condition. The main thing is to be patient, follow instructions and use only high-quality materials. In any case, you’re unlikely to spoil your obsolete bath, but turning it into a new and radiant one is easy!
Tell us about how to restore the protective and decorative coating of your own cast-iron bath. Perhaps you have valuable information that will be useful to site visitors. Please write comments, ask questions, post a photo on the topic in the block below the text of the article.